


How to Accept Donations on Shopify in 2026 (In-store & Shopify POS)

Most Shopify merchants only think about donations online. A button on the homepage, maybe a checkout prompt. But if you sell in person too, you're missing half the opportunity. This guide covers exactly how to accept donations on Shopify, both online and at Shopify POS. No guesswork. No developer needed. Just a clear setup path from installing the best Shopify donation app to your first in-store fundraising campaign.
Why Accept Donations Both Online and In-Store?
Online-only donation setups run but also leave money on the table. Physical shoppers want to give back too, especially at checkout when they're already reaching for their wallet.
An omnichannel donation setup means:
- Customers can give the same way, online or at the counter
- Staff can offer a donation without extra training
- Campaigns run consistently across every channel
- You collect more without running separate systems
If you're already exploring Shopify apps to boost sales and engagement, donations are a simple addition. And the impact it creates on your sales is real.
What You Need Before Setting Up Physical and Digital Donations in Shopify
Before setting anything up, make sure you have:
- A Shopify store with admin access
- Shopify POS installed on your device, if you sell in person
- A donation app installed, such as Donate Now
That's it. No custom code, no third-party checkout, no paying hefty amounts to a Shopify development agency.
How to Accept Donations Online on Shopify in Under 5 Minutes
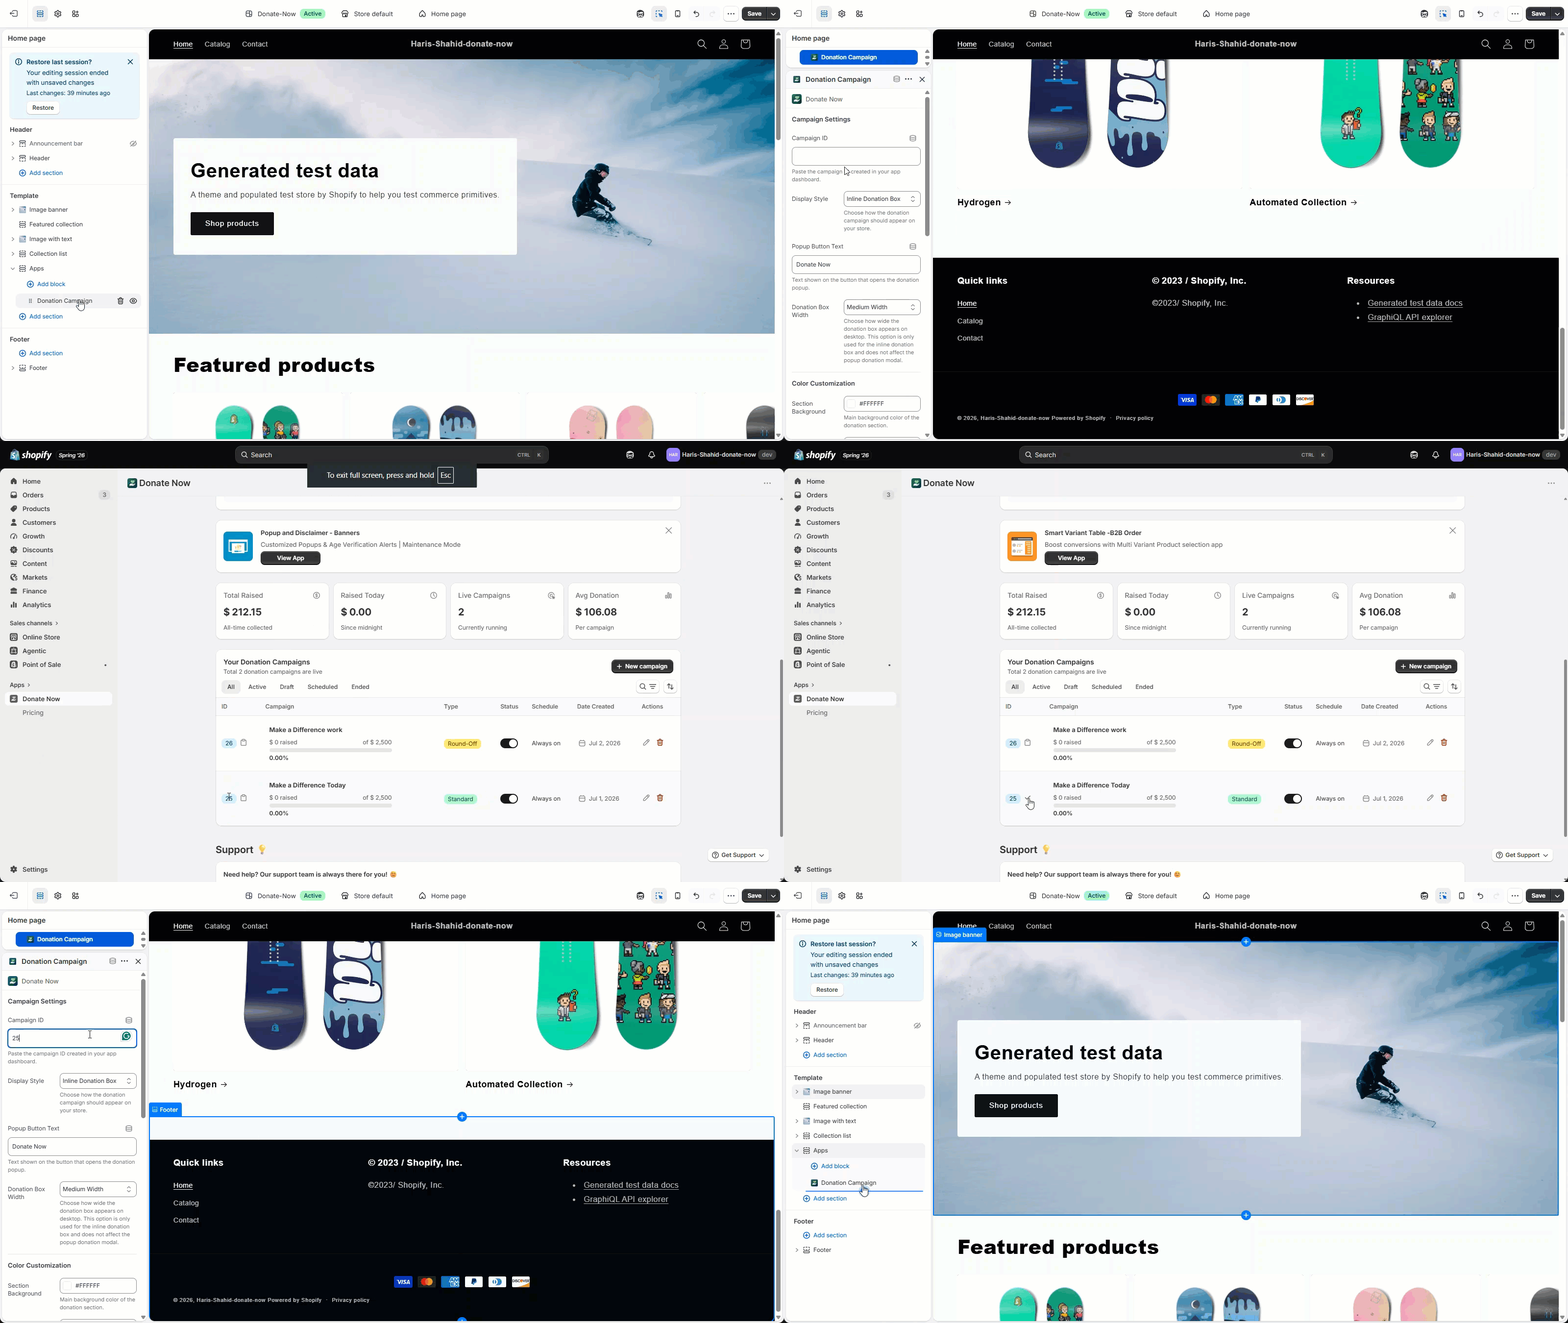
Setting up online donations takes a few simple steps in your Shopify admin and Theme Editor. If you're a visual learner, follow along with the screenshots below.
Step 1: Install a Donation App
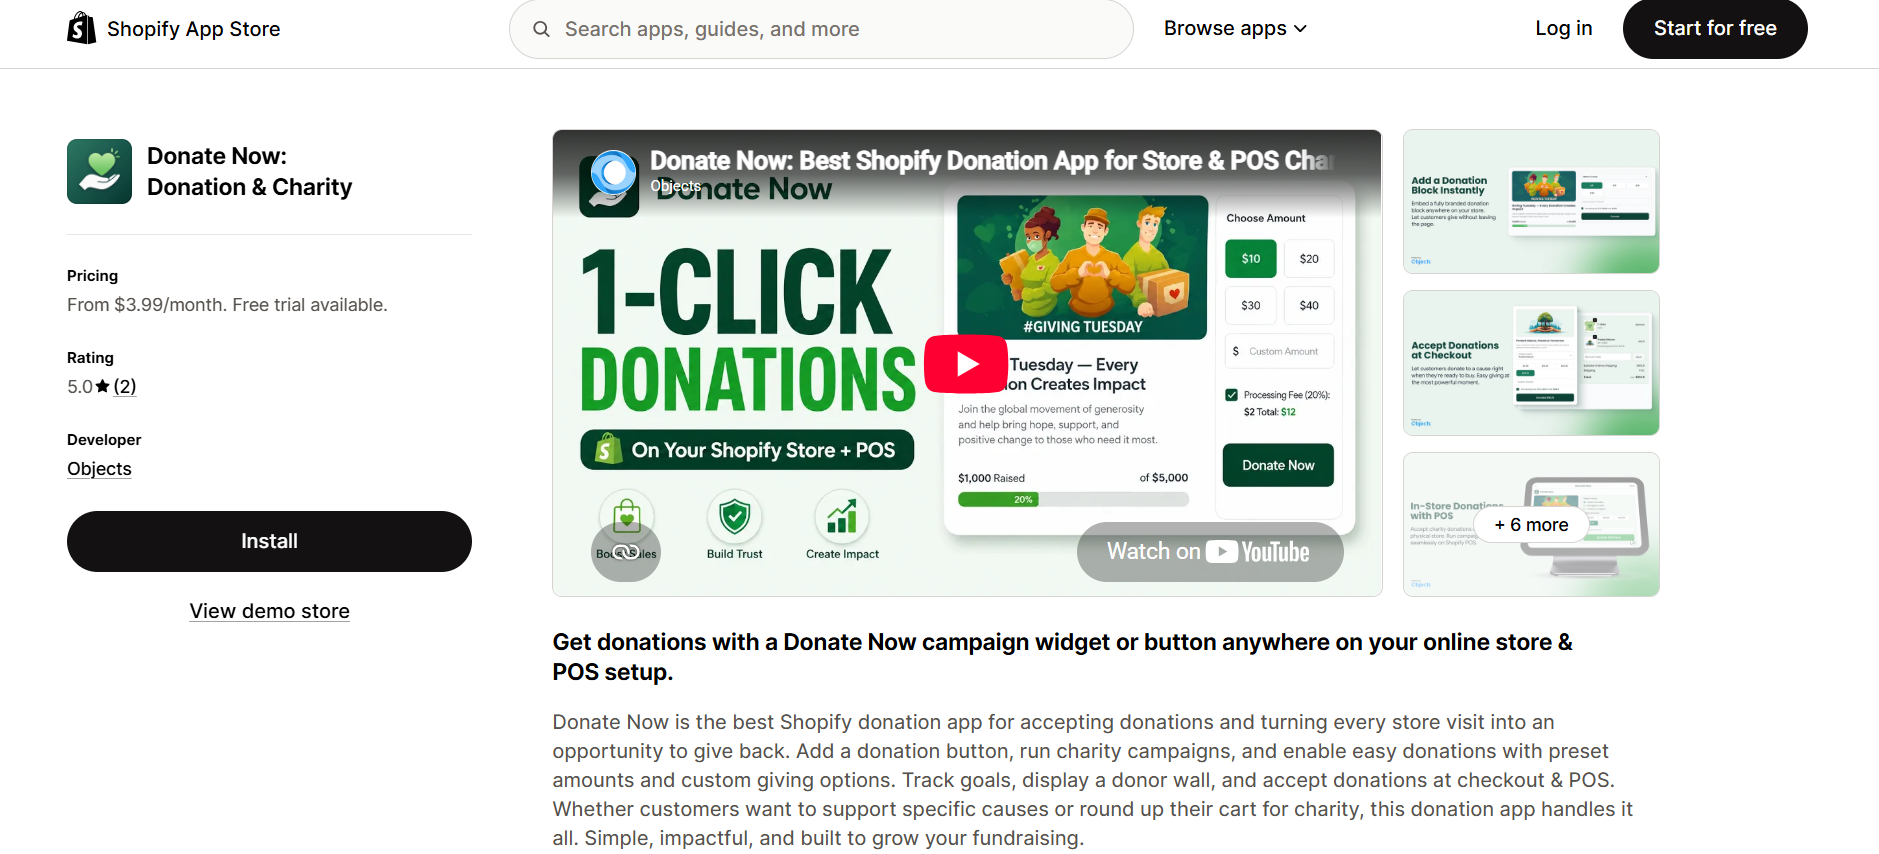
Search the Shopify App Store for a donation app built for flexible, custom giving, or install the Donate Now app. In this guide, we'll use it to create a donation experience inside Shopify. With its outstanding 5.0 rating on the App Store, it's a top choice. It is built specifically to keep every donation as a single, clean cart item, no matter the amount.
Step 2: Create Your First Campaign
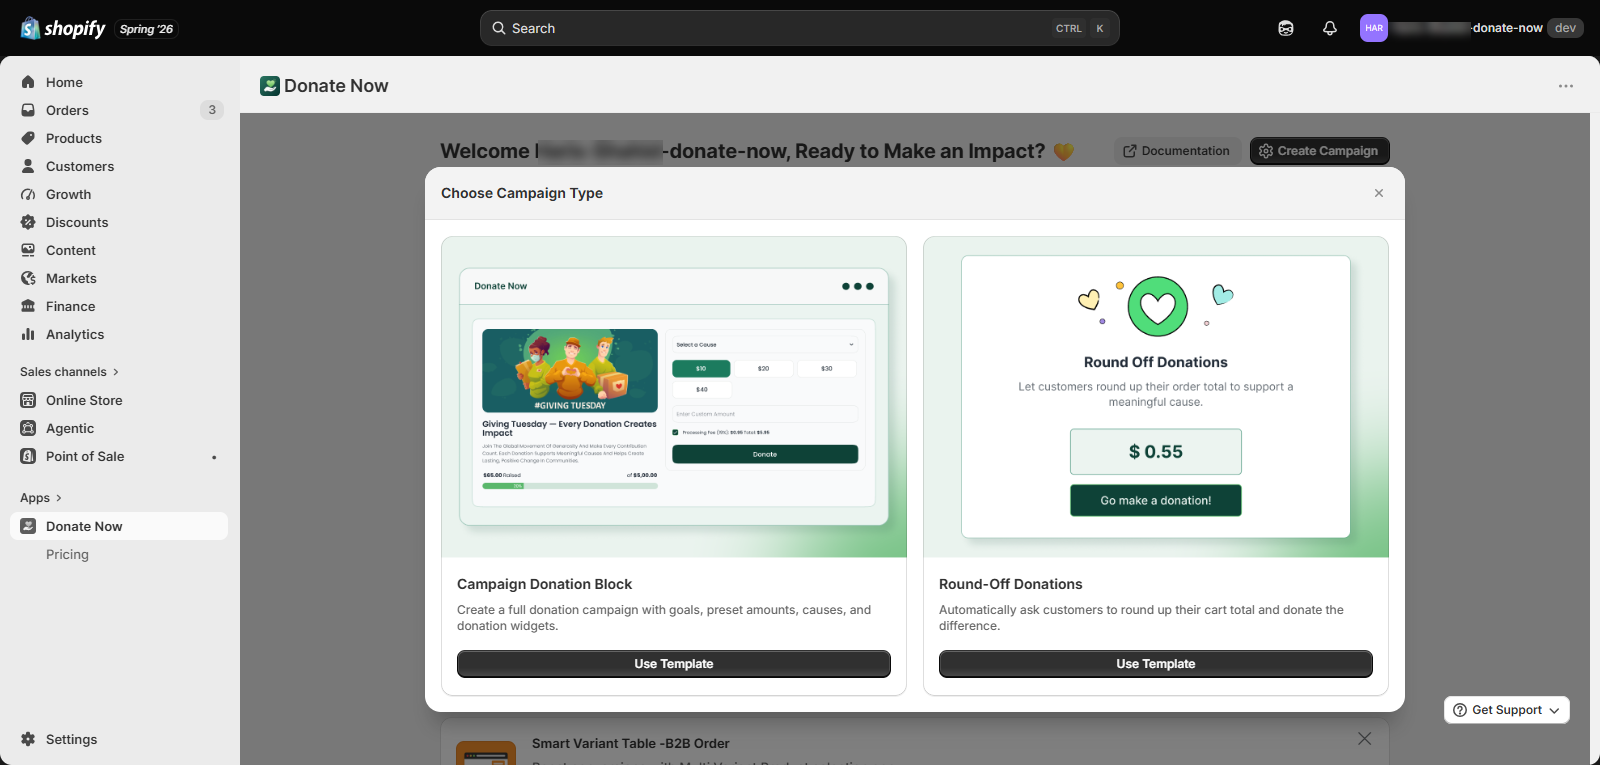
Choose your donation campaign type. Options include a campaign donation block you can place anywhere on the website, and a round-up donation box for checkout.
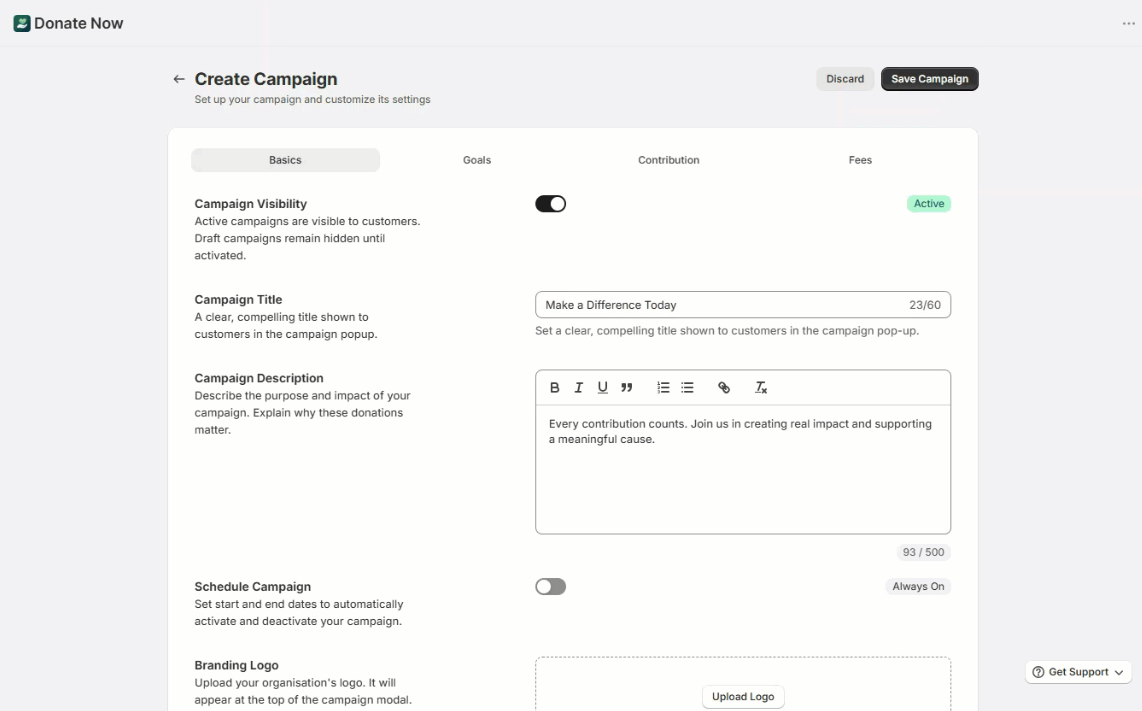
Fill out the basic details of your first Shopify donation campaign.
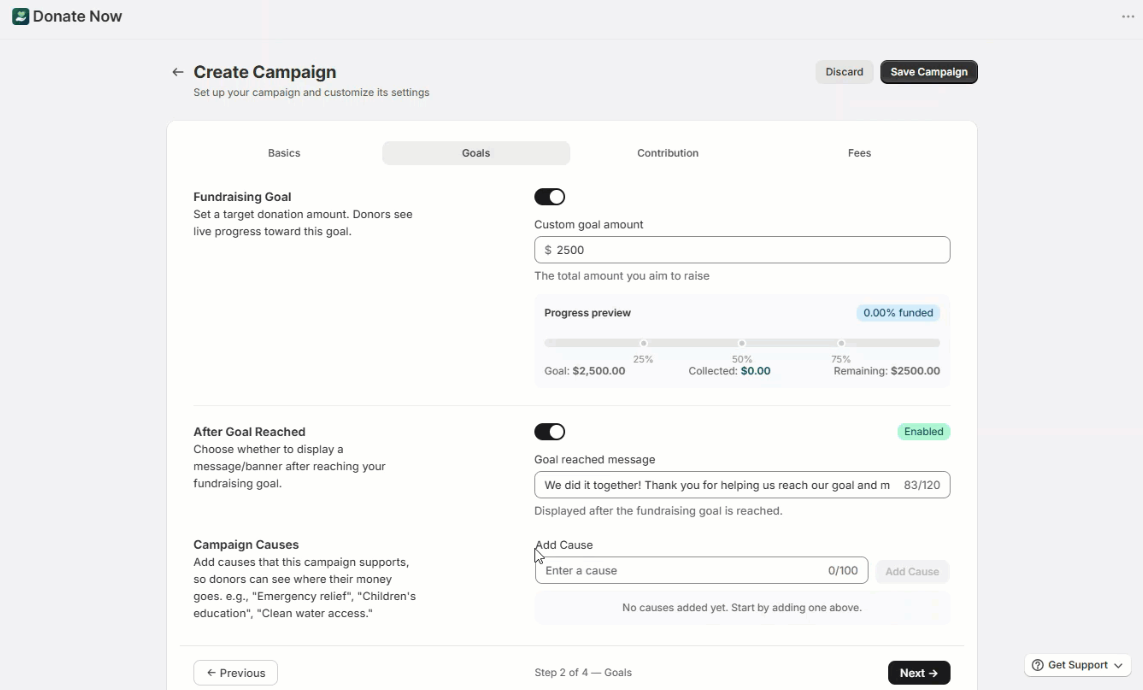
Set your fundraising goal if you want live progress tracking.
Now, set how you want customers to contribute to your campaign.
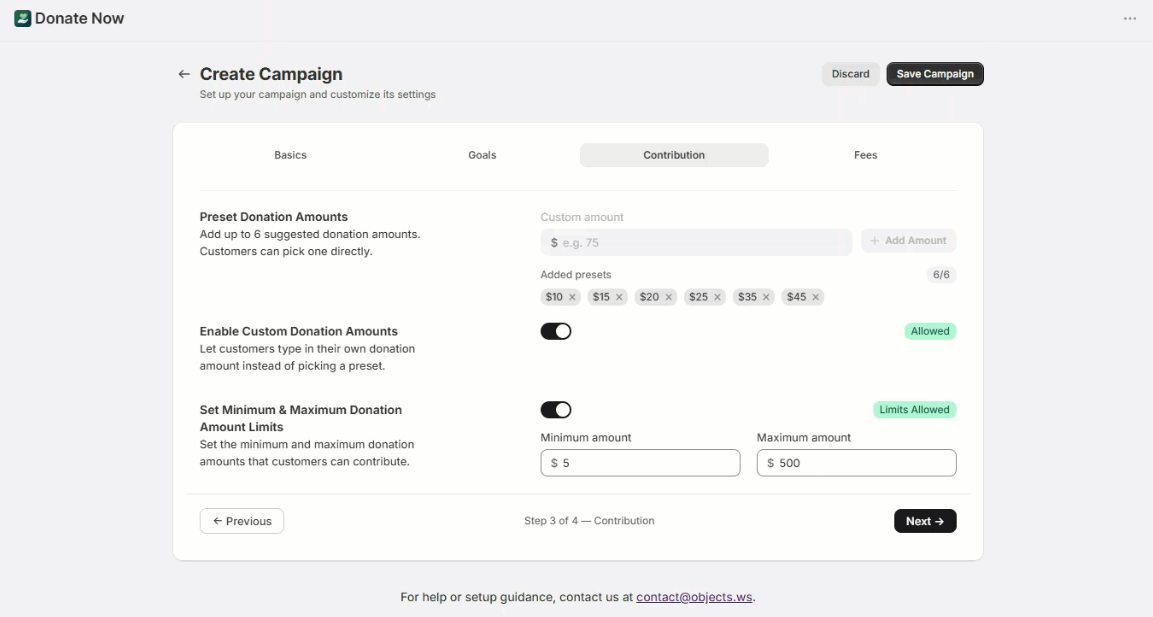
Decide who will cover the transaction fee: you or the donor, then save the campaign.
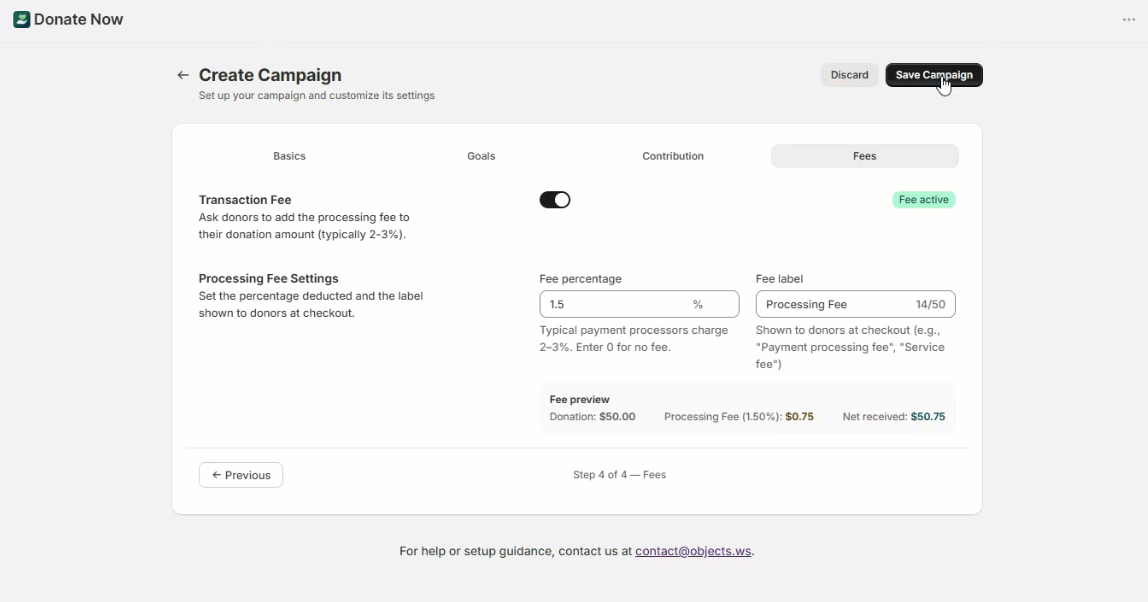
Boom, your first donation campaign is set up in Shopify. Now, let's move to the next step.
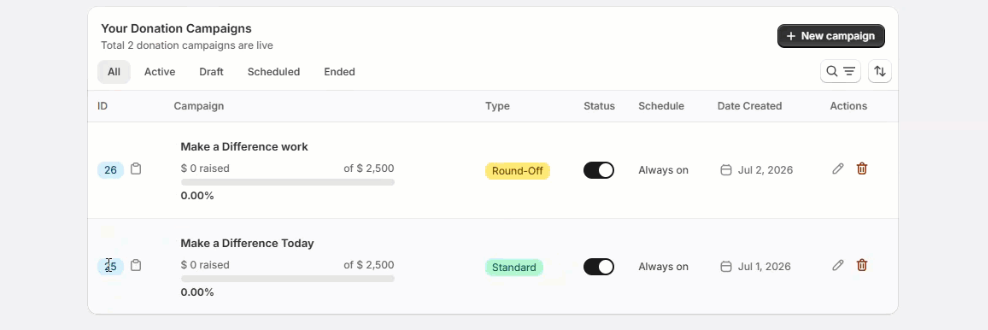
Step 3: Add the Donation Block to Your Theme
Open the Shopify Theme Editor.

Drop the donation widget onto your homepage, product page, or a standalone giving page.
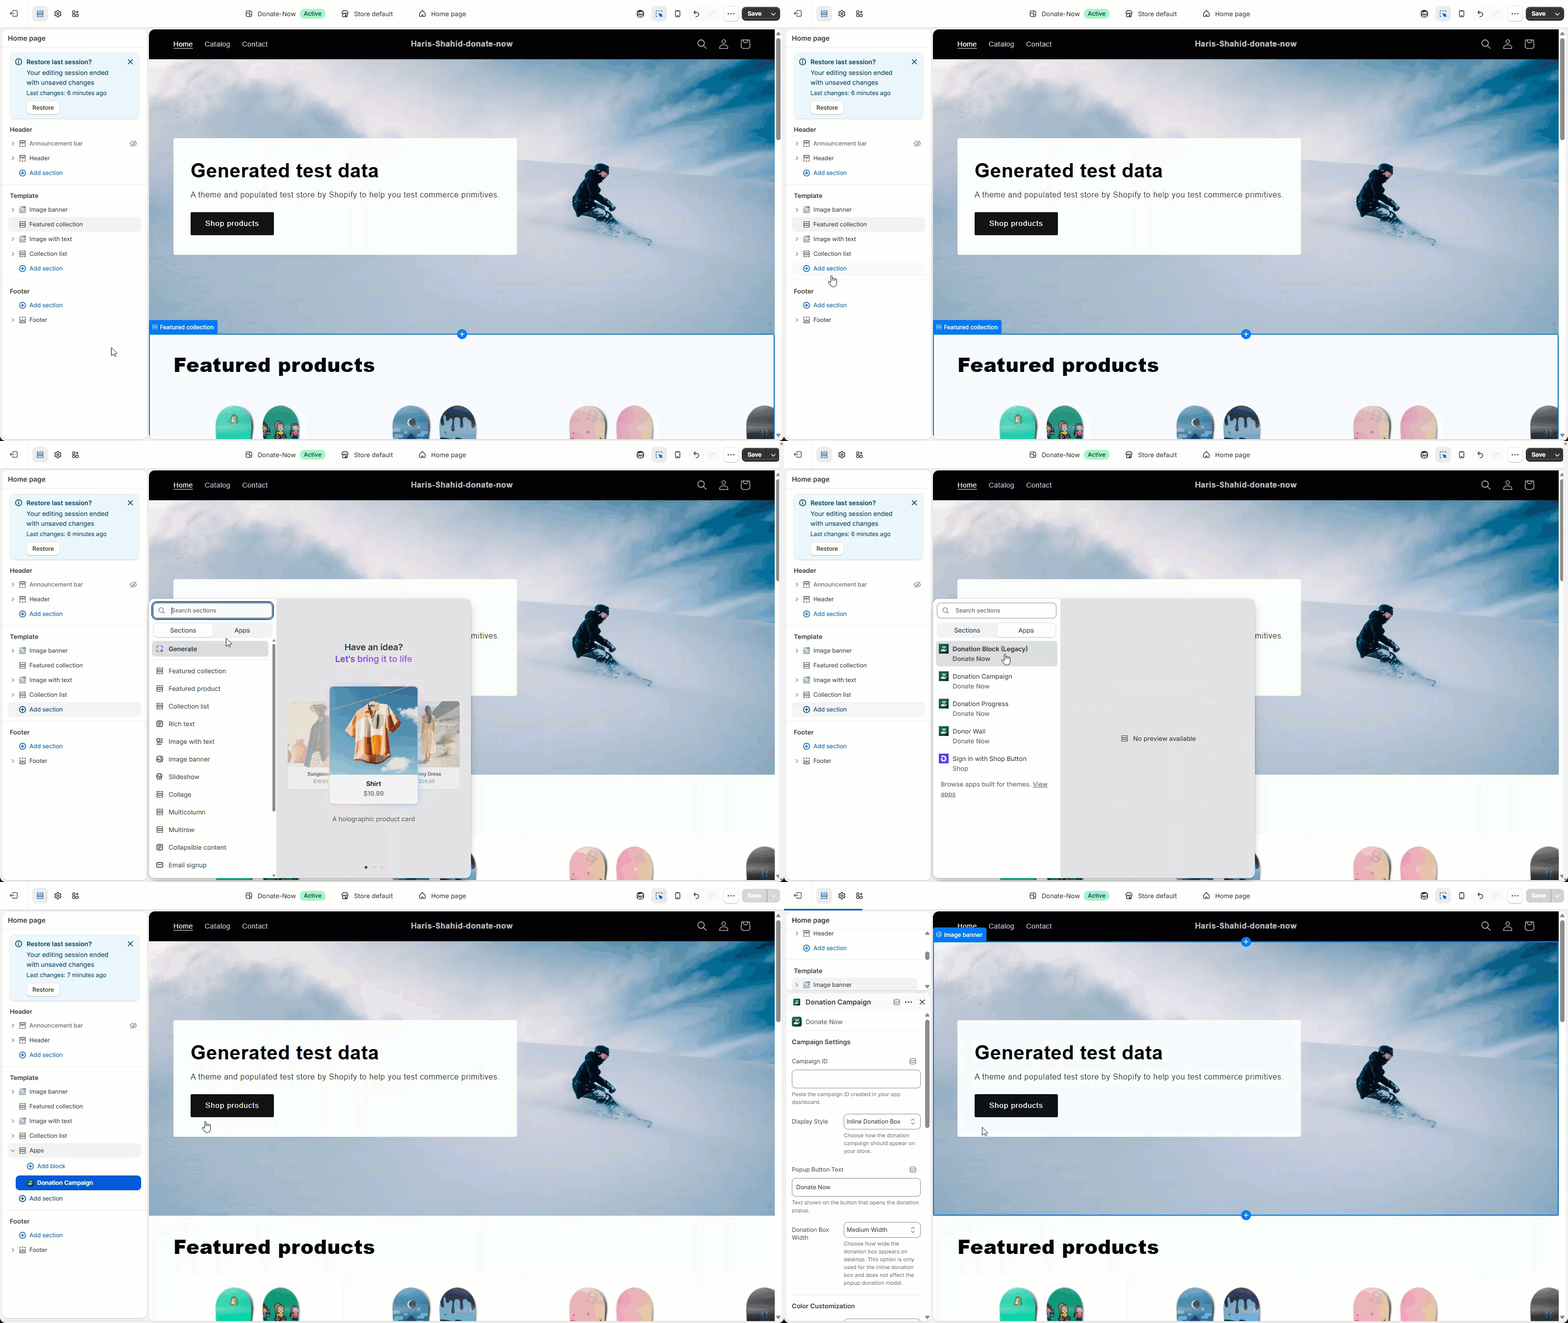
Now add the Donation Campaign ID you want to display here. You'll get it from the Donate Now app dashboard.
Step 4: Customize and Publish
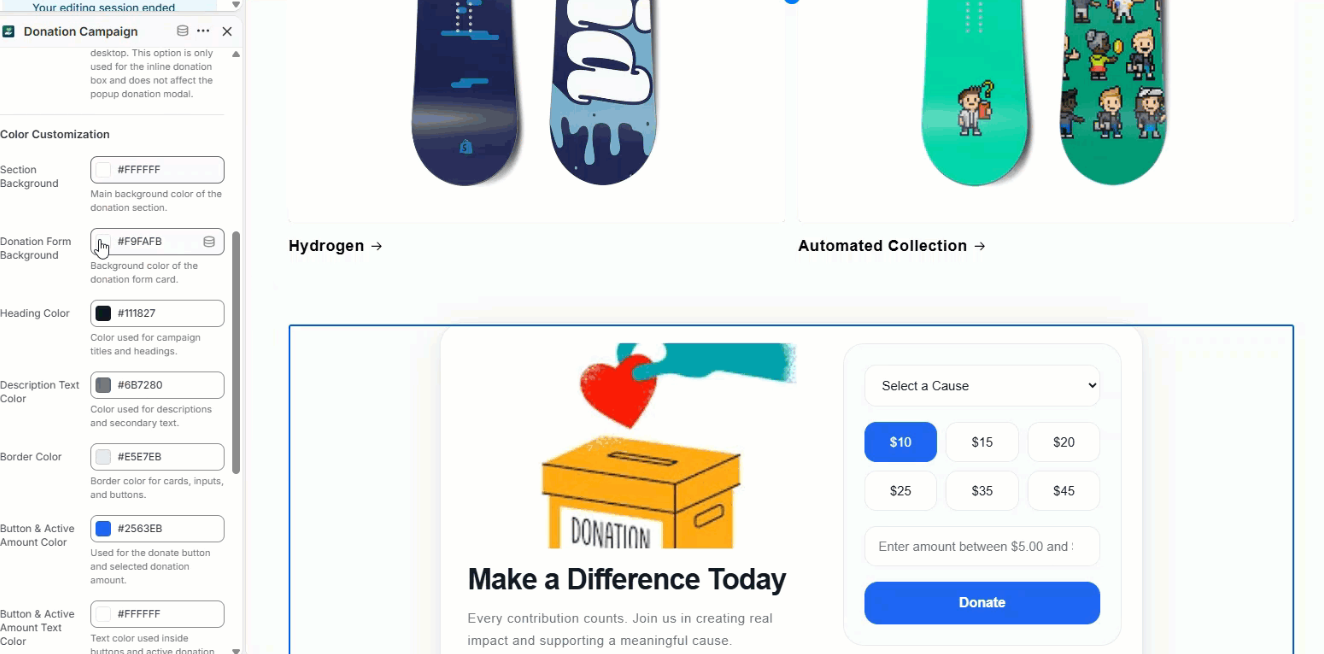
Add your branding, a banner image, and preset donation amounts. Then save the block, and your first donation campaign on your Shopify storefront is live immediately.
How to Accept Donations In Store With Shopify POS Under 2 Minutes
Accepting donations in person takes a similar amount of effort, just inside Shopify POS instead of the Theme Editor. For a quick overview, watch this short Shopify POS donation setup video.
Step 1: Log In and Activate Your POS Device
- Open the Shopify POS app on your device.
- On a browser, go to shopify.com/activate and enter the on-screen code.
- Click Continue to authorize the device.
Step 2: Select Your Store and Location
- Once logged in, choose your store from the list.
- Then select the specific retail location for that device.
Step 3: Add Donation Tiles in Shopify Admin
- In your browser, go to Shopify Admin, then Point of Sale, then Settings, then POS app.
- Open the Smart Grid editor.
- Click Add Tile, select Embedded Apps, then select your donation app.
- Add the tiles you want, such as a campaign donation tile and a round-up tile.
- Save your changes.
Step 4: Verify the Tiles on Your POS Device
Return to the Shopify POS app on your device. The Smart Grid syncs automatically. Your new donation tiles should appear on the POS screen, ready for staff to use at checkout.
Online vs In-Store Donations: What's Different?
| Feature | Online Donations | POS Donations |
|---|---|---|
| Where it lives | Storefront, via Theme Editor | POS Smart Grid tiles |
| Setup location | Shopify Admin + Theme Editor | Shopify Admin + POS app |
| Customer experience | Widget, checkout prompt, or round-up | Staff-assisted, tap to add |
| Best for | Browsing customers, checkout add-ons | Foot traffic, register moments |
| Setup time | Minutes | Minutes |
Both paths lead to the same result. One clean donation, tracked in one place, whether the sale happens online or at the counter.
Common Mistakes to Avoid While Setting Up Donations in Shopify
A few things trip up merchants setting up donations for the first time.
- Forgetting to sync the POS Smart Grid after adding tiles
- Choosing an app that splits custom amounts into multiple cart items
- Skipping a fundraising goal, which reduces urgency for donors
- Not testing the donation flow before going live
Testing both flows yourself, online and in person, takes a few minutes and saves confusion later.
Disclaimer: The Cart Experience Matters in Shopify Donation Setup
After trying multiple Shopify donation apps, we can confidently claim that not every donation app treats custom amounts properly. Some split a single donation into dozens of separate line items behind the scenes. A $73 gift can turn into 70 or more cart entries.
That's confusing for customers and messy for your reporting. Donate Now keeps every donation as one line item, whether it's $5 or $500, online or at POS. And it runs perfectly with other price-sensitive apps like:
Quick Shopify Donation Setup Checklist
- Install a donation app built for both online and POS
- Create your first campaign and set a goal
- Add the donation block to your theme
- Activate your POS device and sync the Smart Grid
- Add donation tiles to your POS layout
- Test both flows before launch
- Go live and start collecting
Final Thoughts
Accepting donations on Shopify doesn't need to be complicated. The setup for both online and in-store giving takes minutes, not hours. The bigger question is choosing a donation app that keeps things clean for customers and simple for your team.
If you're weighing your options, check out a great set of Shopify apps. Many are built for stores that sell both online and in person. Ready to start collecting donations everywhere you sell? Install Donate Now and turn every sale, online or in-store, into a chance to give back.
FAQ
Can I accept donations on Shopify without a developer?
Yes. Donation apps like Donate Now use the Theme Editor and POS Smart Grid. No code is needed. Setup takes minutes for both online and in-store donations.
Do I need Shopify POS to accept in-person donations?
Yes, Shopify POS is required for in-store giving. Once your device is activated, you add donation tiles through the Smart Grid editor. Staff can then offer donations at checkout.
Will a custom donation amount split into multiple cart items?
It depends on the app. Some donation apps split custom amounts into several line items. Donate Now keeps every donation as a single line, no matter the size.
Can customers donate the same way online and in-store?
Yes, if your donation app supports both channels. The same campaign, goal, and branding can run online and at POS. This keeps the experience consistent everywhere you sell.
Article by
Muhammad JafferShopify & WooCommerce Expert
Muhammad Jaffer is a WooCommerce and Shopify expert with 7+ years in eCommerce development, SEO, and content. He builds conversion-focused storefront solutions and writes practical guides that help merchants turn traffic into revenue.
View all articlesDonate Now
Add Donate Now to your Shopify store
#1 Shopify donation app for one-time and recurring donations, checkout round-ups, and a donor wall. Donate Now works online and at Shopify POS.
There’s More to Read
More practical guides from the Objects team.
 Guides
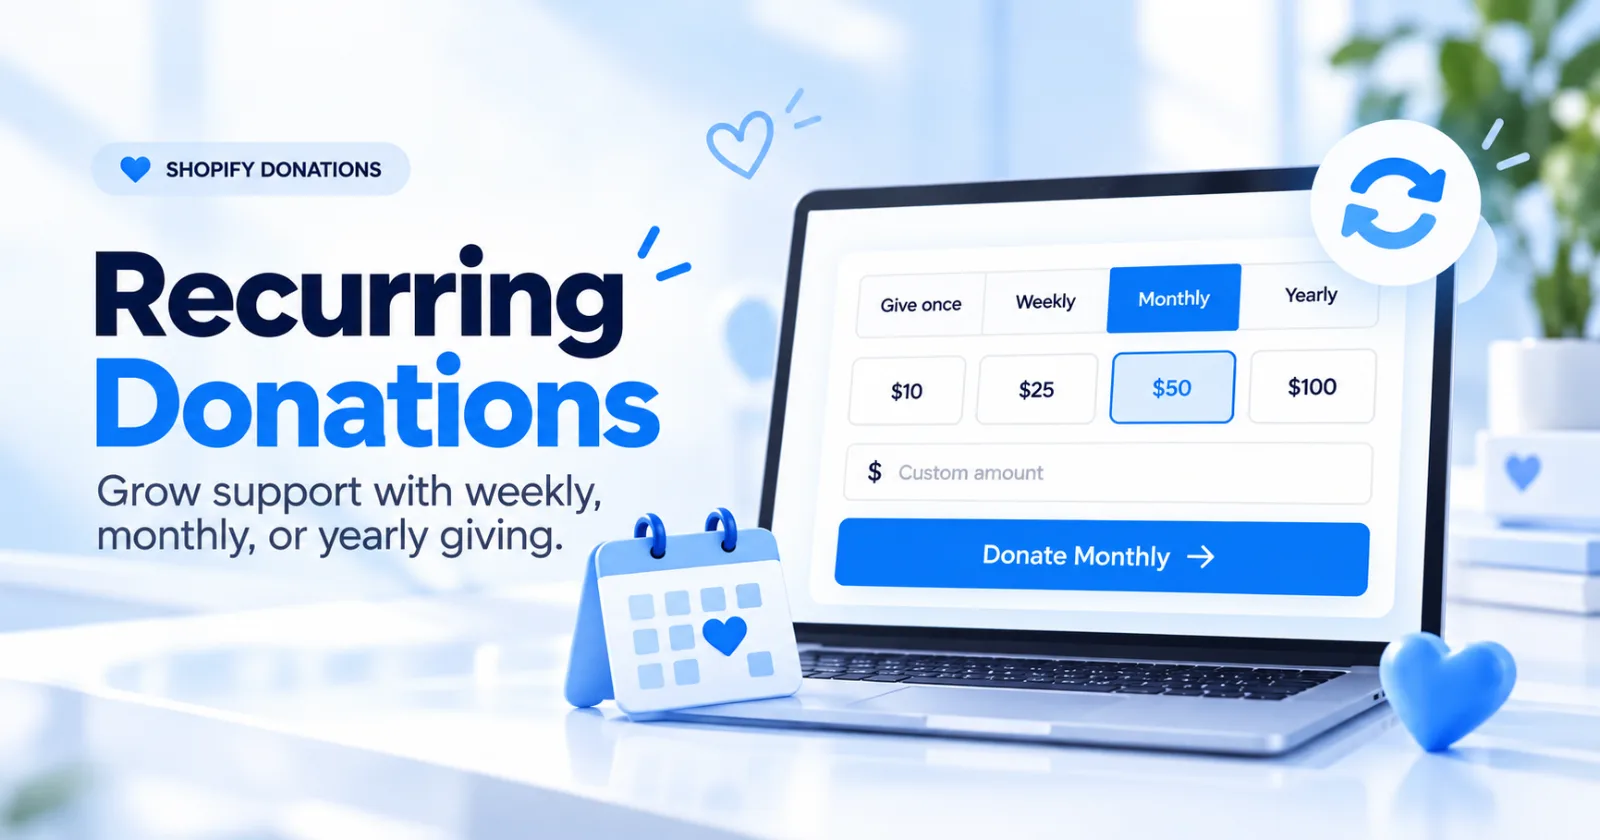
Recurring Donations on Shopify Are Here: Get Repeat Donations With Donate Now
Donate Now now also supports recurring donations. Let supporters give weekly, monthly, or yearly and build steady funding for your cause on Shopify.
by Muhammad Jaffer · October 14, 2026
 Guides
Shopify for Nonprofits (2026): Plans, the Donation Gap, and How to Fix It
Shopify works well for nonprofits selling merch and tickets, but its only native donation option is relabeled tipping. Here's what NPO plans include, where native donations fall short, and how to fix the gap online and in person.
by Muhammad Jaffer · October 4, 2026
 Guides
Shopify Donate Button: Add One in 5 Minutes (3 Easiest Methods)
Shopify has no native donate button. Compare a free donation product, an embedded form, and a no-code app, then see exactly where to place the button so people actually click it.
by Muhammad Jaffer · September 24, 2026